快速入门: RedwoodJS
介绍
为了与其他框架的Quickstart例子保持一致,我们将建立一个RedwoodJS,与正常情况下有点不同。
我们不使用Prisma连接到Supabase Postgres数据库或Prisma迁移,因为在Redwood应用中通常会这样做。 相反,我们将依靠Supabase客户端在网络端做一些工作,并在API端再次使用客户端来做数据获取。
这意味着你要避免运行任何 “yarn rw prisma migrate “命令,还要在部署时仔细检查你的构建命令,以确保Prisma不会重置你的数据库。
TLDR; Prisma目前不支持跨模式外键,所以由于你的Supabase public模式是如何引用auth.users的,反省模式失败。
这个例子提供了使用Supabase和RedwoodJS建立一个简单的用户管理应用程序的步骤(从头开始!)。它包括。
- MemFire Cloud Database:一个用于存储用户数据的Postgres数据库。
- MemFire Cloud Auth:用户可以用魔法链接登录(没有密码,只有电子邮件)。
- MemFire Cloud Storage:用户可以上传照片。
- Instant APIs。当你创建你的数据库表时,API将自动生成。
- 行级安全:数据受到保护,个人只能访问自己的数据。
在本指南结束时,你将拥有一个允许用户登录并更新一些基本资料细节的应用程序。
注意:对于RedwoodJS应用程序,端口将是8910。
GitHub
如果你在任何时候被卡住了,请看一下这个 repo。
关于RedwoodJS
一个Redwood应用程序被分成两部分:一个前端和一个后端。这表现为在一个单一的monorepo中的两个node项目。
前台项目被称为**web,后台项目被称为api**。
它们是独立的项目,因为 “web端 “的代码最终将在用户的浏览器中运行,而 api端的代码将在某个服务器上运行。
重要提示:当本指南提到 API时,指的是Supabase API,当它提到 api端时,指的是RedwoodJS api端。
**api端**是一个GraphQL API的实现。业务逻辑被组织成 服务,代表他们自己的内部API,可以从外部GraphQL请求和其他内部服务中调用。
网络端 “***是用React构建的。Redwood的路由器可以简单地将URL路径映射到React的 页面组件(并在每个路径上自动分割你的应用代码)。
页面可以包含一个 Layout组件来包装内容。它们还包含 单元格和常规的React组件。
单元允许你声明性地管理一个获取和显示数据的组件的生命周期。
为了与其他框架的Quickstart例子保持一致,我们将建立一个RedwoodJS,与正常情况下有点不同。
我们不使用Prisma来连接Supabase Postgres数据库或Prisma迁移,因为在Redwood应用中通常会这样做。
相反,我们将依靠Supabase客户端来完成**web方面的一些工作,并在api**方面再次使用客户端来进行数据获取。
项目设置
在我们开始构建之前,我们要设置我们的数据库和API。这就像在Supabase中启动一个新项目一样简单 然后在数据库中创建一个 “模式”。
在设置Supabase时,你会与你的项目仪表板互动。然而,大多数RedwoodJS的设置步骤将与Redwood CLI互动,以生成路由、页面、组件等。 因此,请确保在你的项目目录中准备好一个终端。
创建一个项目
- 进入MemFire Cloud。
- 点击
新项目。 - 输入你的项目细节。
- 等待新数据库的启动。
设置数据库模式
现在我们要设置数据库模式。我们可以使用SQL编辑器中的 用户管理启动器快速启动。
或者你可以直接复制/粘贴下面的SQL,然后自己运行它。
关于Prisma和迁移的重要说明
因为这个快速入门并没有使用Prisma来管理数据库模式、播种或运行迁移,所以在运行一些典型的Redwood CLI命令时,你***需要格外小心。
获取API密钥
现在你已经创建了一些数据库表,你已经准备好使用自动生成的API插入数据。
我们只需要从API设置中获得URL以及anon、service_role和JWT_SECRET键。
- 进入仪表板中的
应用设置->API页面。 - 在这个页面上找到你的API
URL,anon, 和service_role键。
构建应用程序
让我们开始从头开始构建RedwoodJS应用程序。
RedwoodJS需要Node.js(>=14.x <=16.x)和Yarn(>=1.15)。
确保你已经安装了yarn,因为RedwoodJS依靠它来在工作空间中管理它的包,用于其web和api“side”。
初始化一个RedwoodJS应用程序
我们可以使用Create Redwood App命令来初始化
一个名为supabase-redwoodjs的应用程序。
  yarn create redwood-app supabase-redwoodjs
cd supabase-redwoodjs
当应用程序正在安装时,你应该看到。
  ✔ Creating Redwood app
  ✔ Checking node and yarn compatibility
  ✔ Creating directory 'supabase-redwoodjs'
✔ Installing packages
  ✔ Running 'yarn install'... (This could take a while)
✔ Convert TypeScript files to JavaScript
✔ Generating types

Thanks for trying out Redwood!
然后让我们通过运行setup auth命令来安装唯一的额外依赖supabase-js:
yarn redwood setup auth supabase
当被提示时。
覆盖现有的/api/src/lib/auth.[jt]s?
说,是,它将在你的应用程序中设置Supabase客户端,并提供用于Supabase验证的钩子。
  ✔ Generating auth lib...
  ✔ Successfully wrote file `./api/src/lib/auth.js`
  ✔ Adding auth config to web...
  ✔ Adding auth config to GraphQL API...
  ✔ Adding required web packages...
  ✔ Installing packages...
  ✔ One more thing...

  You will need to add your Supabase URL (SUPABASE_URL), public API KEY,
  and JWT SECRET (SUPABASE_KEY, and SUPABASE_JWT_SECRET) to your .env file.
接下来,我们要在.env中保存环境变量。
我们需要API URL以及你[早些时候]复制的anon和jwt_secret键(#get-theapi-keys)。
  SUPABASE_URL=YOUR_SUPABASE_URL
SUPABASE_KEY=YOUR_SUPABASE_ANON_KEY
SUPABASE_JWT_SECRET=YOUR_SUPABASE_JWT_SECRET
最后,你还需要把***的 网络端环境变量保存到 redwood.toml中。
  [web]
  title = "Supabase Redwood Quickstart"
  port = 8910
  apiProxyPath = "/.redwood/functions"
  includeEnvironmentVariables = ["SUPABASE_URL", "SUPABASE_KEY"]
[api]
  port = 8911
[browser]
  open = true
这些变量将暴露在浏览器上,这完全没有问题。 它们允许你的Web应用程序使用你的公共匿名密钥初始化Supabase客户端因为我们在数据库中启用了 行级安全 。
你会看到这些被用来在web/src/App.js中配置你的Supabase客户端。
  // ... Redwood imports
import { AuthProvider } from '@redwoodjs/auth'
import { createClient } from '@supabase/supabase-js'

// ...

const supabase = createClient(process.env.SUPABASE_URL, process.env.SUPABASE_KEY)

const App = () => (
  <FatalErrorBoundary page={FatalErrorPage}>
    <RedwoodProvider titleTemplate="%PageTitle | %AppTitle">
      <AuthProvider client={supabase} type="supabase">
        <RedwoodApolloProvider>
          <Routes />
        </RedwoodApolloProvider>
      </AuthProvider>
    </RedwoodProvider>
  </FatalErrorBoundary>
)

export default App
还有一个可选的步骤是更新CSS文件web/src/index.css以使应用程序看起来漂亮。
你可以找到这个文件的全部内容这里。
启动RedwoodJS和你的第一个页面
让我们通过启动应用程序来测试我们此刻的设置。
yarn rw dev
注意:你也可以用rw来表示redwood,如yarn rw来运行Redwood CLI命令。
你应该看到一个 欢迎来到RedwoodJS的页面和一个关于还没有任何页面的信息。
因此,让我们创建一个 主页。
  yarn rw generate page home /

✔ Generating page files...
  ✔ Successfully wrote file `./web/src/pages/HomePage/HomePage.stories.js`
  ✔ Successfully wrote file `./web/src/pages/HomePage/HomePage.test.js`
  ✔ Successfully wrote file `./web/src/pages/HomePage/HomePage.js`
✔ Updating routes file...
✔ Generating types ...
注意:这里的斜线/很重要,因为它创建了一个根级路由。
如果你想的话,你可以停止dev服务器;要看到你的改变,只要确保再次运行yarn rw dev。
你应该在web/src/Routes.js中看到Home页面路由。
  import { Router, Route } from '@redwoodjs/router'

const Routes = () => {
  return (
    <Router>
      <Route path="/" page={HomePage} name="home" />
      <Route notfound page={NotFoundPage} />
    </Router>
  )
}

export default Routes
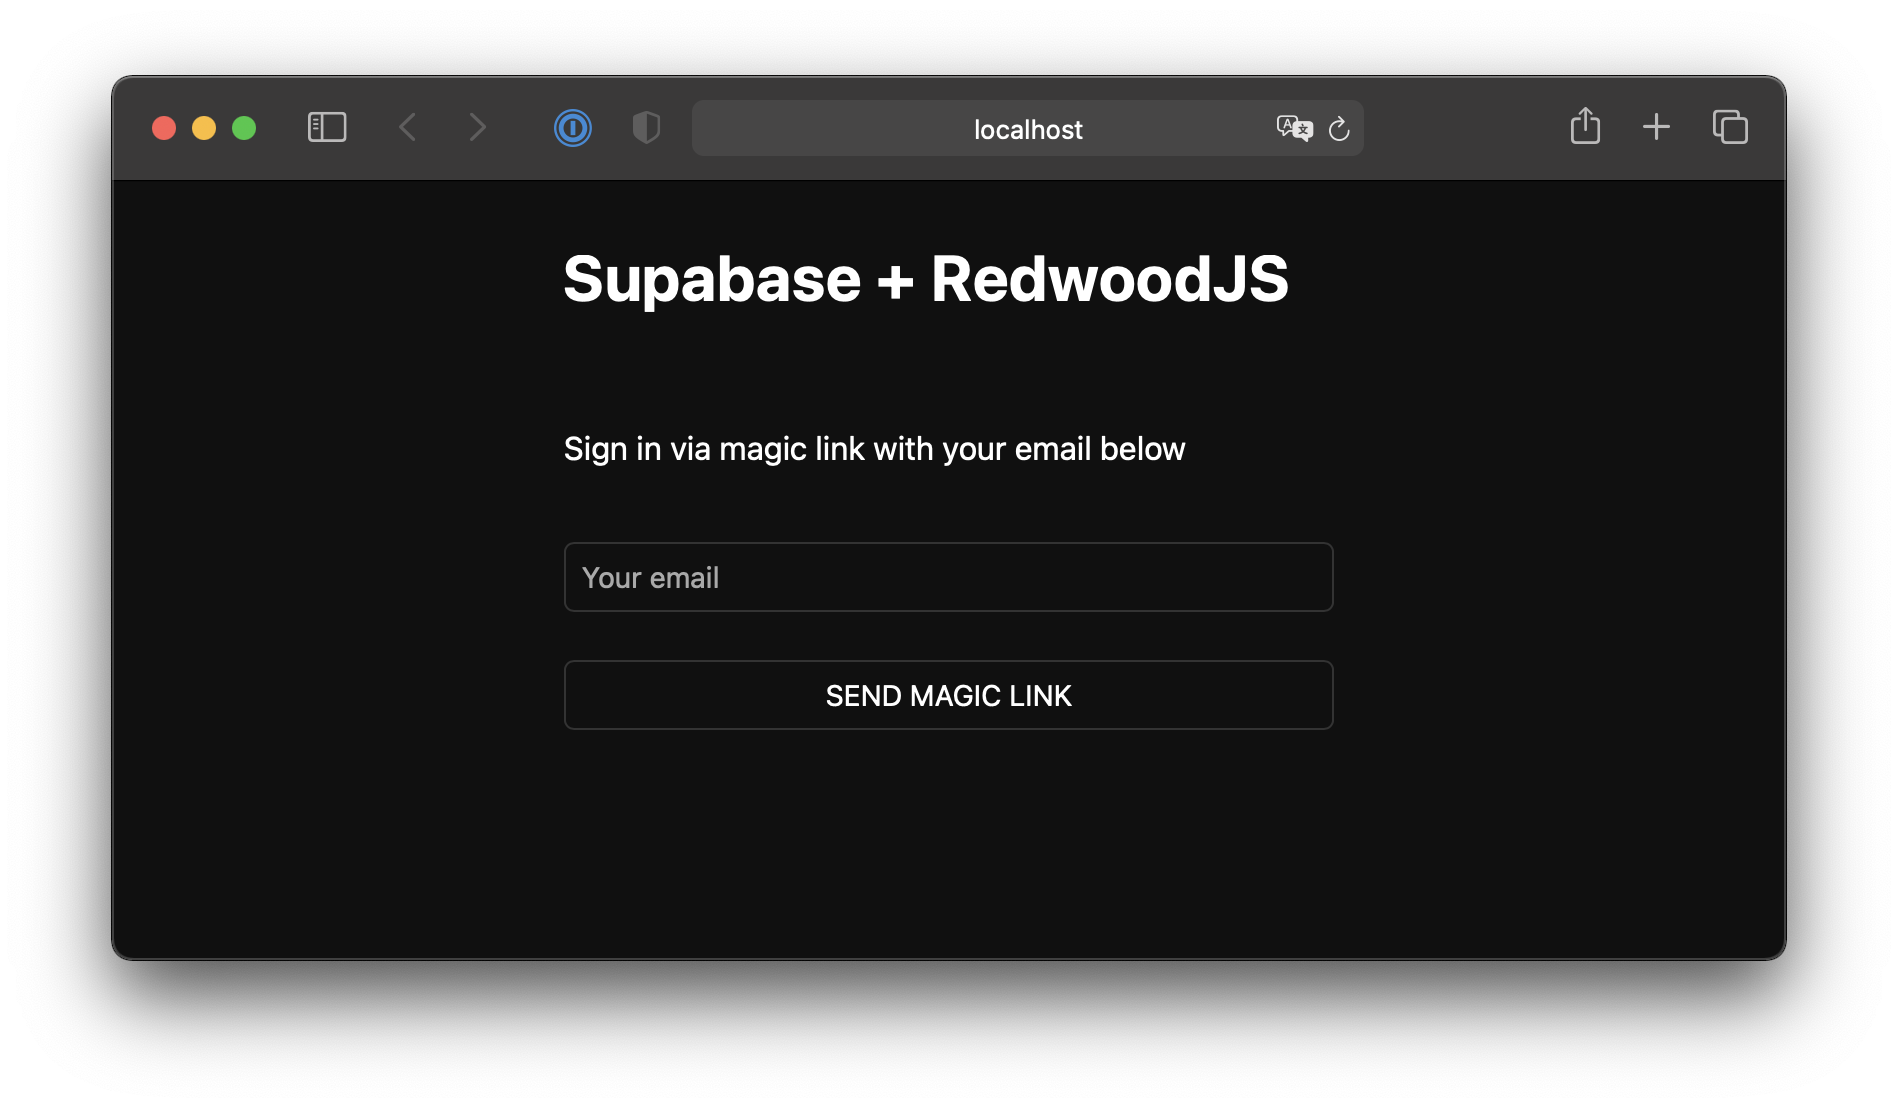
设置一个登录组件
让我们建立一个Redwood组件来管理登录和注册。我们将使用Magic Links,所以用户可以用他们的电子邮件登录,而不需要使用密码。
  yarn rw g component auth

  ✔ Generating component files...
    ✔ Successfully wrote file `./web/src/components/Auth/Auth.test.js`
    ✔ Successfully wrote file `./web/src/components/Auth/Auth.stories.js`
    ✔ Successfully wrote file `./web/src/components/Auth/Auth.js`
现在,更新Auth.js组件,包含。
  import { useState } from 'react'
import { useAuth } from '@redwoodjs/auth'

const Auth = () => {
  const { logIn } = useAuth()
  const [loading, setLoading] = useState(false)
  const [email, setEmail] = useState('')

  const handleLogin = async (email) => {
    try {
      setLoading(true)
      const { error } = await logIn({ email })
      if (error) throw error
      alert('Check your email for the login link!')
    } catch (error) {
      alert(error.error_description || error.message)
    } finally {
      setLoading(false)
    }
  }

  return (
    <div className="row flex-center flex">
      <div className="col-6 form-widget">
        <h1 className="header">Supabase + RedwoodJS</h1>
        <p className="description">Sign in via magic link with your email below</p>
        <div>
          <input
            className="inputField"
            type="email"
            placeholder="Your email"
            value={email}
            onChange={(e) => setEmail(e.target.value)}
          />
        </div>
        <div>
          <button
            onClick={(e) => {
              e.preventDefault()
              handleLogin(email)
            }}
            className={'button block'}
            disabled={loading}
          >
            {loading ? <span>Loading</span> : <span>Send magic link</span>}
          </button>
        </div>
      </div>
    </div>
  )
}

export default Auth
设置一个账户组件
在用户登录后,我们可以让他们编辑他们的个人资料细节和管理他们的账户。
让我们为其创建一个新的组件,名为Account.js。
  yarn rw g component account

  ✔ Generating component files...
    ✔ Successfully wrote file `./web/src/components/Account/Account.test.js`
    ✔ Successfully wrote file `./web/src/components/Account/Account.stories.js`
    ✔ Successfully wrote file `./web/src/components/Account/Account.js`
然后更新文件,使其包含:
  import { useState, useEffect } from 'react'
import { useAuth } from '@redwoodjs/auth'

const Account = () => {
  const { client: supabase, currentUser, logOut } = useAuth()
  const [loading, setLoading] = useState(true)
  const [username, setUsername] = useState(null)
  const [website, setWebsite] = useState(null)
  const [avatar_url, setAvatarUrl] = useState(null)

  useEffect(() => {
    getProfile()
  }, [supabase.auth.session])

  async function getProfile() {
    try {
      setLoading(true)
      const user = supabase.auth.user()

      let { data, error, status } = await supabase
        .from('profiles')
        .select(`username, website, avatar_url`)
        .eq('id', user.id)
        .single()

      if (error && status !== 406) {
        throw error
      }

      if (data) {
        setUsername(data.username)
        setWebsite(data.website)
        setAvatarUrl(data.avatar_url)
      }
    } catch (error) {
      alert(error.message)
    } finally {
      setLoading(false)
    }
  }

  async function updateProfile({ username, website, avatar_url }) {
    try {
      setLoading(true)
      const user = supabase.auth.user()

      const updates = {
        id: user.id,
        username,
        website,
        avatar_url,
        updated_at: new Date(),
      }

      let { error } = await supabase.from('profiles').upsert(updates, {
        returning: 'minimal', // Don't return the value after inserting
      })

      if (error) {
        throw error
      }

      alert('Updated profile!')
    } catch (error) {
      alert(error.message)
    } finally {
      setLoading(false)
    }
  }

  return (
    <div className="row flex-center flex">
      <div className="col-6 form-widget">
        <h1 className="header">Supabase + RedwoodJS</h1>
        <p className="description">Your profile</p>
        <div className="form-widget">
          <div>
            <label htmlFor="email">Email</label>
            <input id="email" type="text" value={currentUser.email} disabled />
          </div>
          <div>
            <label htmlFor="username">Name</label>
            <input
              id="username"
              type="text"
              value={username || ''}
              onChange={(e) => setUsername(e.target.value)}
            />
          </div>
          <div>
            <label htmlFor="website">Website</label>
            <input
              id="website"
              type="website"
              value={website || ''}
              onChange={(e) => setWebsite(e.target.value)}
            />
          </div>

          <div>
            <button
              className="button primary block"
              onClick={() => updateProfile({ username, website, avatar_url })}
              disabled={loading}
            >
              {loading ? 'Loading ...' : 'Update'}
            </button>
          </div>

          <div>
            <button className="button block" onClick={() => logOut()}>
              Sign Out
            </button>
          </div>
        </div>
      </div>
    </div>
  )
}

export default Account
注意:你会在快速入门中多次看到useAuth()的使用。Redwood的useAuth钩子提供了方便的方法来访问
logIn, logOut, currentUser,以及访问supabase验证客户端。我们将使用它来获得一个
的实例来与你的API交互。
更新主页
现在我们已经有了所有的组件,让我们更新你的HomePage页面来使用它们。
  import { useAuth } from '@redwoodjs/auth'
import { MetaTags } from '@redwoodjs/web'

import Account from 'src/components/Account'
import Auth from 'src/components/Auth'

const HomePage = () => {
  const { isAuthenticated } = useAuth()

  return (
    <>
      <MetaTags title="Welcome" />
      {!isAuthenticated ? <Auth /> : <Account />}
    </>
  )
}

export default HomePage
我们在这里做的是,如果你没有登录,就显示登录表,如果你登录了,就显示你的账户资料。
启动
一旦完成,在终端窗口运行这个程序,启动dev服务器。
yarn rw dev
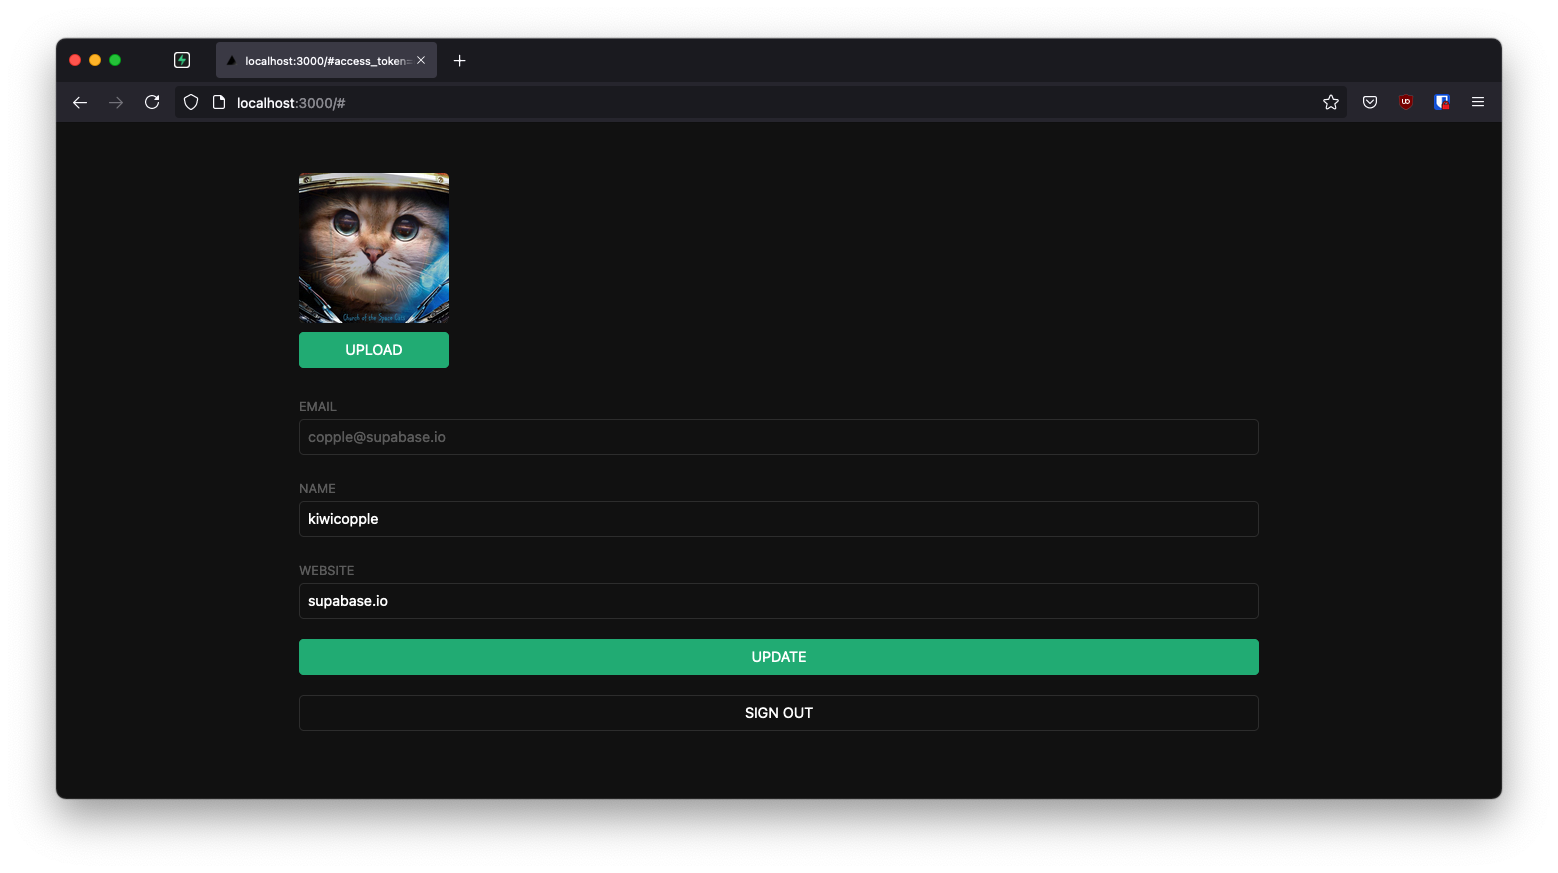
然后打开浏览器到localhost:8910,你应该看到完成的应用程序。
个人照片
每个Supabase项目都配置了存储,用于管理照片和视频等大文件。
创建一个上传小组件
让我们为用户创建一个头像,以便他们可以上传个人资料照片。我们可以从创建一个新的组件开始。
  yarn rw g component avatar
  ✔ Generating component files...
    ✔ Successfully wrote file `./web/src/components/Avatar/Avatar.test.js`
    ✔ Successfully wrote file `./web/src/components/Avatar/Avatar.stories.js`
    ✔ Successfully wrote file `./web/src/components/Avatar/Avatar.js`
现在,更新你的 “头像 “组件,使其包含以下小部件。
  import { useEffect, useState } from 'react'
import { useAuth } from '@redwoodjs/auth'

const Avatar = ({ url, size, onUpload }) => {
  const { client: supabase } = useAuth()

  const [avatarUrl, setAvatarUrl] = useState(null)
  const [uploading, setUploading] = useState(false)

  useEffect(() => {
    if (url) downloadImage(url)
  }, [url])

  async function downloadImage(path) {
    try {
      const { data, error } = await supabase.storage.from('avatars').download(path)
      if (error) {
        throw error
      }
      const url = URL.createObjectURL(data)
      setAvatarUrl(url)
    } catch (error) {
      console.log('Error downloading image: ', error.message)
    }
  }

  async function uploadAvatar(event) {
    try {
      setUploading(true)

      if (!event.target.files || event.target.files.length === 0) {
        throw new Error('You must select an image to upload.')
      }

      const file = event.target.files[0]
      const fileExt = file.name.split('.').pop()
      const fileName = `${Math.random()}.${fileExt}`
      const filePath = `${fileName}`

      let { error: uploadError } = await supabase.storage.from('avatars').upload(filePath, file)

      if (uploadError) {
        throw uploadError
      }

      onUpload(filePath)
    } catch (error) {
      alert(error.message)
    } finally {
      setUploading(false)
    }
  }

  return (
    <div>
      {avatarUrl ? (
        <img
          src={avatarUrl}
          alt="Avatar"
          className="avatar image"
          style={{ height: size, width: size }}
        />
      ) : (
        <div className="avatar no-image" style={{ height: size, width: size }} />
      )}
      <div style={{ width: size }}>
        <label className="button primary block" htmlFor="single">
          {uploading ? 'Uploading ...' : 'Upload'}
        </label>
        <input
          style={{
            visibility: 'hidden',
            position: 'absolute',
          }}
          type="file"
          id="single"
          accept="image/*"
          onChange={uploadAvatar}
          disabled={uploading}
        />
      </div>
    </div>
  )
}

export default Avatar
添加新的小组件
然后我们就可以把这个小部件添加到账户组件中。
  // Import the new component
import Avatar from 'src/components/Avatar'

// ...

return (
  <div className="form-widget">
    {/* Add to the body */}
    <Avatar
      url={avatar_url}
      size={150}
      onUpload={(url) => {
        setAvatarUrl(url)
        updateProfile({ username, website, avatar_url: url })
      }}
    />
    {/* ... */}
  </div>
)
下一步
在这个阶段,你已经有了一个功能完备的应用程序!
.
- 请登录MemFire Cloud
- 了解更多关于RedwoodJS
- 访问RedwoodJS论述社区