本页
微信小程序登录认证
前言
为了顺应国内用户的使用习惯,MemFire Cloud 的SDK推出了微信可以在不同应用场景下的登录方式,以下两种场景是MemFire Cloud 推荐的微信登录方式,我们以简单的小示例来做示范,具体的实现还需要根据业务自身的场景来判断。
① 微信用户授权登录
首次进入小程序,点击登录后会立即跳转个人中心页进行个人资料的修改,或者可以点击个人中心页面进行个人资料的修改
前提条件:
- 在MemFire Cloud认证服务商页面启用微信小程序认证

图例
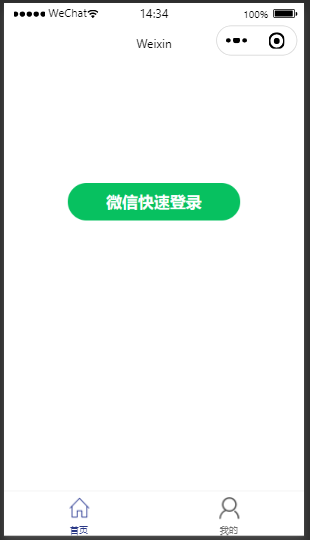

首页代码示例:
html
<button style="border-radius: 100rpx;margin-top: 300rpx;" type="primary" bindtap="login">微信快速登录</button>
SDK使用教程
signInWithWechat接口接受一个wx.login返回的code参数,通过code兑换openid等信息,并判断用户是否存在,不存在则自动创建
  // pages/main/index.ts
import { supabase } from '../../lib/supabase'
Page({
  data: {

  },
  login(){
    wx.login({
      success: async res => {
        const { data, error } = await supabase.auth.signInWithWechat({code:res.code})
        if(error){
          wx.showToast({
            title: error?.error || error?.msg,
            icon: "none",
            duration: 2000
          })
        }else if(data){
          setTimeout(() => {
            wx.showModal({
              title: '提示',
              content: '登录成功!去填充个人资料吧!',
              success (res) {
                if (res.confirm) {
                  wx.switchTab({
                    url:'/pages/me/index'
                  })
                } else if (res.cancel) {
                }
              }
            })
          }, 1000);
        }
      },
      fail(err){
        wx.showToast({
          title: err.errMsg,
          icon: "none",
          duration: 2000
        })
      }
    })
  },

})
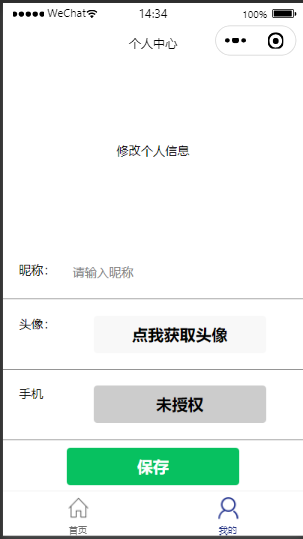
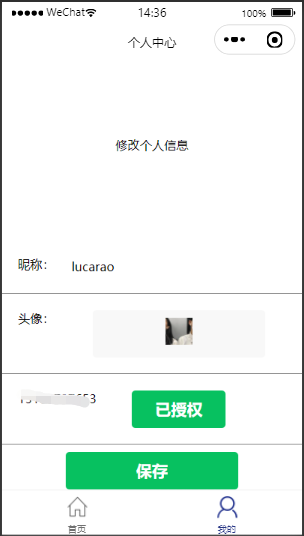
个人中心页面
html
<view class="container">
  <view style="margin-bottom:20rpx">修改个人信息</view>

</view>
<!--昵称-->
<view class="section">
  <view class="section-title">昵称:</view>
  <view>
    <input type="text"  bindinput='getNickNameValue' name="getNickNameValue" value="{{nikeName}}" placeholder="请输入昵称"/>
  </view>
</view>
<!--头像-->
<view class="section">
  <view class="section-title">头像:</view>
  <view>
    <button class="avatar-wrapper" open-type="chooseAvatar" bind:chooseavatar="onChooseAvatar">
    <text wx:if="{{!avatarUrl}}">点我获取头像</text>
    <image wx:else class="avatar" src="{{avatarUrl}}"></image>
</button>
  </view>
</view>
<view class="section">
  <view wx:if="{{phone}}" class="section-title">{{phone}}</view>
  <view wx:else class="section-title">手机</view>
  <view>
    <button style="width: 237rpx;" class="{{phone ? 'auth':'no-auth'}} phone-wrapper" open-type="getPhoneNumber" bindgetphonenumber="getPhoneNumber">
    <text wx:if="{{!phone}}">未授权</text>
    <text wx:else>已授权</text>
</button>
  </view>
</view>
<button style="margin-top: 20rpx;" bindtap="submit" type="primary">保存</button>
SDK使用教程
进入页面先调用getUser()判断是否登陆过,登录过会通过这个接口去获取用户信息,获取之后进行信息回填;没有登陆过则不会进行信息回填。
- 修改头像选择图片时,需要将头像的临时地址上传到memfire cloud的对象存储生成永久图片,再进行下载,在此之前需要去memfire cloud创建一个新的公开bucket。
  import { supabase } from '../../lib/supabase'
// pages/me/index.ts
Page({

  /**
   * 页面的初始数据
   */
  data: {
    avatarUrl: null,
    nikeName: null,
    phone: null
  },
  //判断用户是否登录过,是否进行信息回填
  async onLoad(){
   const { data: { user } } = await supabase.auth.getUser()
    if(user){
      if(user.data.phone){
        this.setData({phone:user.data.phone})
      }
      if(user.data.user_metadata){
        this.setData({avatarUrl:user.data.user_metadata.arvatar,nikeName:user.data.user_metadata.nickname.value})
      }
    }
  },
  async submit() {
    if (!this.data.nikeName || !this.data.avatarUrl) {
      wx.showToast({
        title: '请输入完整个人资料',
        icon: "none",
        duration: 2000
      })
      return;
    }
    const { data, error } = await supabase.auth.updateUser({ "data": { "nickname": this.data.nikeName, "arvatar": this.data.avatarUrl } })
    if (error) {
      wx.showToast({
        title: error?.error || error?.msg,
        icon: "none",
        duration: 2000
      })
    } else if (data) {
      wx.showToast({
        title: "修改成功!",
        icon: "none",
        duration: 2000
      })
    }
  },
  async getPhoneNumber(e) {
    const { data: { user }, error } = await supabase.auth.wechatBindPhone({
      code: e.detail.code,
    })
    if (error) {
      wx.showToast({
        title: JSON.stringify(error) || error?.msg,
        icon: "none",
        duration: 2000
      })
    } else if (user) {
      this.setData({
        phone: user.data.phone
      })
    }
  },
  //选择头像,需要将头像的临时地址上传到memfire cloud的对象存储生成永久图片,再进行下载
  //在此之前需要去memfire cloud创建一个新的bucket
  async onChooseAvatar(e) {
    let { avatarUrl } = e.detail
    wx.getImageInfo({
      src: avatarUrl, // 图片路径,必须是本地路径,可以相对路径或绝对路径
      success: async function (res) {
        const file = { fileType: "image", width:res.width,height:res.height, tempFilePath: avatarUrl }
        const fileExt = avatarUrl.split('.').pop()
        const fileName = `${Math.random()}.${fileExt}`
        const filePath = `${fileName}`
        let { error: uploadError } = await supabase.storage
          .from('avatar')
          .upload(filePath, file)
        if (uploadError) {
          throw uploadError
        }
        const { data } = await supabase
          .storage
          .from('avatar')
          .getPublicUrl(filePath)
          this.setData({ avatarUrl: data.publicUrl })
      }
  })
})
css
  page{
  font-size: 32rpx;
}
.section{
  padding: 40rpx;
  border-bottom: 1px solid gray;
}
.section:last-child{
  border: none;
}
.section-title{
  width: 20%;
  float: left;
}
label{
  padding: 0 20rpx;
}
.avatar{
  width: 70rpx;
  height: 70rpx;
}
.phone-wrapper{
  width: 180rpx;
}
.no-auth{
  background-color: #ccc;
}
.auth{
  background-color: #07c160;
  color: #fff;
}
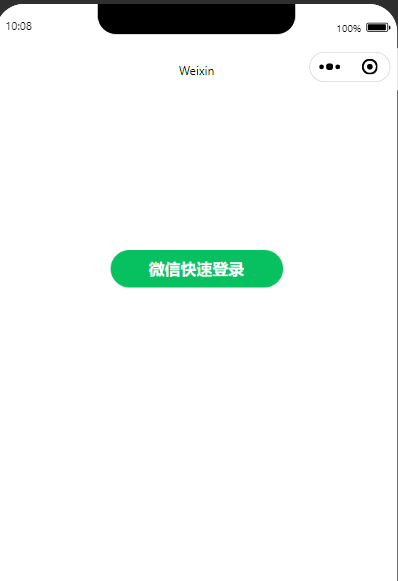
② 手机号授权登录
使用手机号授权登录,用户初次进入小程序。 场景:
- 需要拿到用户的手机号。
- 小程序对应的web端是使用手机号登录注册的,小程序端不得不也需要使用手机号授权登录。
前提条件:
- 只有企业账号才有权限进行手机授权登录
- 在MemFire Cloud认证服务商页面启用微信小程序认证
图例

html
<button style="border-radius: 100rpx;margin-top: 300rpx;" type="primary" open-type="getPhoneNumber" bindgetphonenumber="getPhoneNumber">微信快速登录</button>
首先需要通过signInWithWechat接口来帮助用户进行注册,成功之后再使用wechatBindPhone将手机号绑定到用户信息中,这样就实现了手机号授权登录。
  import { supabase } from '../../lib/supabase'
// pages/phone_login/index.ts
Page({

  /**
   * 页面的初始数据
   */
  data: {

  },

  /**
   * 生命周期函数--监听页面加载
   */
  onLoad() {

  },

  async getPhoneNumber(e: any) {
    wx.login({
      success: async res => {
        const { data, error } = await supabase.auth.signInWithWechat({ code: res.code })
        if(error){
          wx.showToast({
            title: JSON.stringify(error) || error?.msg,
            icon: "none",
            duration: 2000
          })
        }else if (data) {
          const { data, error } = await supabase.auth.wechatBindPhone({
            code: e.detail.code,
          })
          if (error) {
            wx.showToast({
              title: JSON.stringify(error) || error?.msg,
              icon: "none",
              duration: 2000
            })
          } else if (data) {
            wx.showToast({
              title: '登录成功!',
              icon: "none",
              duration: 1000
            })
          }
        }
      },
    })
  }
})
更多api详情请参考资料