原生移动深度链接
在某些身份验证情况下,您需要处理链接回应用程序以完成用户登录。
何时需要设置深层链接 link
- 魔法链接登录。
- 已启用 “确认电子邮件 “并正在使用电子邮件登录。
- 重设电子邮件登录密码。
- 调用
.signInWithOAuth()方法。
要链接到开发构建或独立应用程序,您需要为应用程序指定自定义 URL 方案。您可以在应用程序配置(app.json、app.config.js)中注册一个方案,方法是在 scheme 键下添加一个字符串:
  {
  "expo": {
    "scheme": "com.supabase"
  }
}
在项目的 用户认证-> URL 配置 中添加重定向 URL,例如 com.supabase://***。
最后,实现 OAuth 和链接处理程序。有关在 React Native 中初始化 supabase-js 客户端的说明,请参阅 supabase-js 参考资料。
  import { Button } from "react-native";
import { makeRedirectUri } from "expo-auth-session";
import * as QueryParams from "expo-auth-session/build/QueryParams";
import * as WebBrowser from "expo-web-browser";
import * as Linking from "expo-linking";
import { supabase } from "app/utils/supabase";

WebBrowser.maybeCompleteAuthSession(); // required for web only
const redirectTo = makeRedirectUri();

const createSessionFromUrl = async (url: string) => {
  const { params, errorCode } = QueryParams.getQueryParams(url);

  if (errorCode) throw new Error(errorCode);
  const { access_token, refresh_token } = params;

  if (!access_token) return;

  const { data, error } = await supabase.auth.setSession({
    access_token,
    refresh_token,
  });
  if (error) throw error;
  return data.session;
};

const performOAuth = async () => {
  const { data, error } = await supabase.auth.signInWithOAuth({
    provider: "github",
    options: {
      redirectTo,
      skipBrowserRedirect: true,
    },
  });
  if (error) throw error;

  const res = await WebBrowser.openAuthSessionAsync(
    data?.url ?? "",
    redirectTo
  );

  if (res.type === "success") {
    const { url } = res;
    await createSessionFromUrl(url);
  }
};

const sendMagicLink = async () => {
  const { error } = await supabase.auth.signInWithOtp({
    email: "example@email.com",
    options: {
      emailRedirectTo: redirectTo,
    },
  });

  if (error) throw error;
  // Email sent.
};

export default function Auth() {
  // Handle linking into app from email app.
  const url = Linking.useURL();
  if (url) createSessionFromUrl(url);

  return (
    <>
      <Button onPress={performOAuth} title="Sign in with Github" />
      <Button onPress={sendMagicLink} title="Send Magic Link" />
    </>
  );
}
为了获得最佳的用户体验,建议使用通用链接,这需要更复杂的设置。您可以在 Expo docs 中找到详细的设置说明。
目前,supabase_flutter 支持 Android、iOS、Web、MacOS 和 Windows 上的深度链接。
深度链接配置 link
- 转到
用户认证->URL 配置页面。 - 您需要在 “附加重定向 URL “字段中输入应用程序重定向回调 URL。
重定向回调 URL 的格式应为 [YOUR_SCHEME]://[YOUR_HOSTNAME]。这里,“io.supabase.flutterquickstart://login-callback “只是一个例子,你可以为 “YOUR_SCHEME “和 “YOUR_HOSTNAME “选择任何你想要的,只要该方案在用户的设备上是唯一的。因此,通常会使用网站的反向域名。
平台特定配置 link
  <manifest ...>
  <!-- ... other tags -->
  <application ...>
    <activity ...>
      <!-- ... other tags -->

      <!-- Deep Links -->
      <intent-filter>
        <action android:name="android.intent.action.VIEW" />
        <category android:name="android.intent.category.DEFAULT" />
        <category android:name="android.intent.category.BROWSABLE" />
        <!-- Accepts URIs that begin with YOUR_SCHEME://YOUR_HOST -->
        <data
          android:scheme="YOUR_SCHEME"
          android:host="YOUR_HOSTNAME" />
      </intent-filter>
    </activity>
  </application>
</manifest>
对于深度链接,“android:host “属性是可选的。
更多信息: https://developer.android.com/training/app-links/deep-linking
对于 ** 自定义 URL 方案**,您需要在ios/Runner/Info.plist 中声明方案(或通过 Xcode 的目标信息编辑器、
下的 URL 类型)中声明方案:
  <!-- ... other tags -->
<plist>
<dict>
  <!-- ... other tags -->
  <key>CFBundleURLTypes</key>
  <array>
    <dict>
      <key>CFBundleTypeRole</key>
      <string>Editor</string>
      <key>CFBundleURLSchemes</key>
      <array>
        <string>[YOUR_SCHEME]</string>
      </array>
    </dict>
  </array>
  <!-- ... other tags -->
</dict>
</plist>
更多信息: https://developer.apple.com/documentation/xcode/defining-a-custom-url-scheme-for-your-app
在 Windows 中设置深层链接比其他平台多了几个步骤。 了解更多
在 <PROJECT_DIR>\windows\runner\win32_window.h 中声明此方法
    // Dispatches link if any.
  // This method enables our app to be with a single instance too.
  // This is optional but mandatory if you want to catch further links in same app.
  bool SendAppLinkToInstance(const std::wstring& title);
在"<PROJECT_DIR>\windows\runner\win32_window.cpp “的顶部添加以下内容
#include "app_links_windows/app_links_windows_plugin.h"
在 <PROJECT_DIR>\windows\runner\win32_window.cpp 中添加此方法
  bool Win32Window::SendAppLinkToInstance(const std::wstring& title) { // Find our exact window.
  // 精确查找窗口
  HWND hwnd = ::FindWindow(kWindowClassName, title.c_str());

  if (hwnd) {
    // Dispatch new link to current window
    SendAppLink(hwnd);

    // (Optional) Restore our window to front in same state
    WINDOWPLACEMENT place = { sizeof(WINDOWPLACEMENT) };
    GetWindowPlacement(hwnd, &place);
    switch(place.showCmd) {
      case SW_SHOWMAXIMIZED:
          ShowWindow(hwnd, SW_SHOWMAXIMIZED);
          break;
      case SW_SHOWMINIMIZED:
          ShowWindow(hwnd, SW_RESTORE);
          break;
      default:
          ShowWindow(hwnd, SW_NORMAL);
          break;
    }
    SetWindowPos(0, HWND_TOP, 0, 0, 0, 0, SWP_SHOWWINDOW | SWP_NOSIZE | SWP_NOMOVE);
    SetForegroundWindow(hwnd);
    // END Restore

    // Window has been found, don't create another one.
    return true;
  }

  return false;
}
在 CreateAndShow 中添加对前一个方法的调用
  bool Win32Window::CreateAndShow(const std::wstring& title,
                                const Point& origin,
                                const Size& size) {
if (SendAppLinkToInstance(title)) {
    return false;
}

...
此时,您可以注册自己的方案。 在 Windows 系统中,URL 协议是在 Windows 注册表中设置的。
本软件包不会为您设置。
您可以在应用程序中使用 url_protocol 来实现。
最贴切的解决方案是在安装程序中加入注册表修改,以允许 注销注册。
在 macos/Runner/Info.plist 中的 <plist version="1.0"><dict> 章节中添加此 XML 章节:
  <!-- ... other tags -->
<plist version="1.0">
<dict>
  <!-- ... other tags -->
  <key>CFBundleURLTypes</key>
  <array>
      <dict>
          <key>CFBundleURLName</key>
          <!-- abstract name for this URL type (you can leave it blank) -->
          <string>sample_name</string>
          <key>CFBundleURLSchemes</key>
          <array>
              <!-- your schemes -->
              <string>sample</string>
          </array>
      </dict>
  </array>
  <!-- ... other tags -->
</dict>
</plist>
深度链接配置 link
- 进入 授权设置 页面。
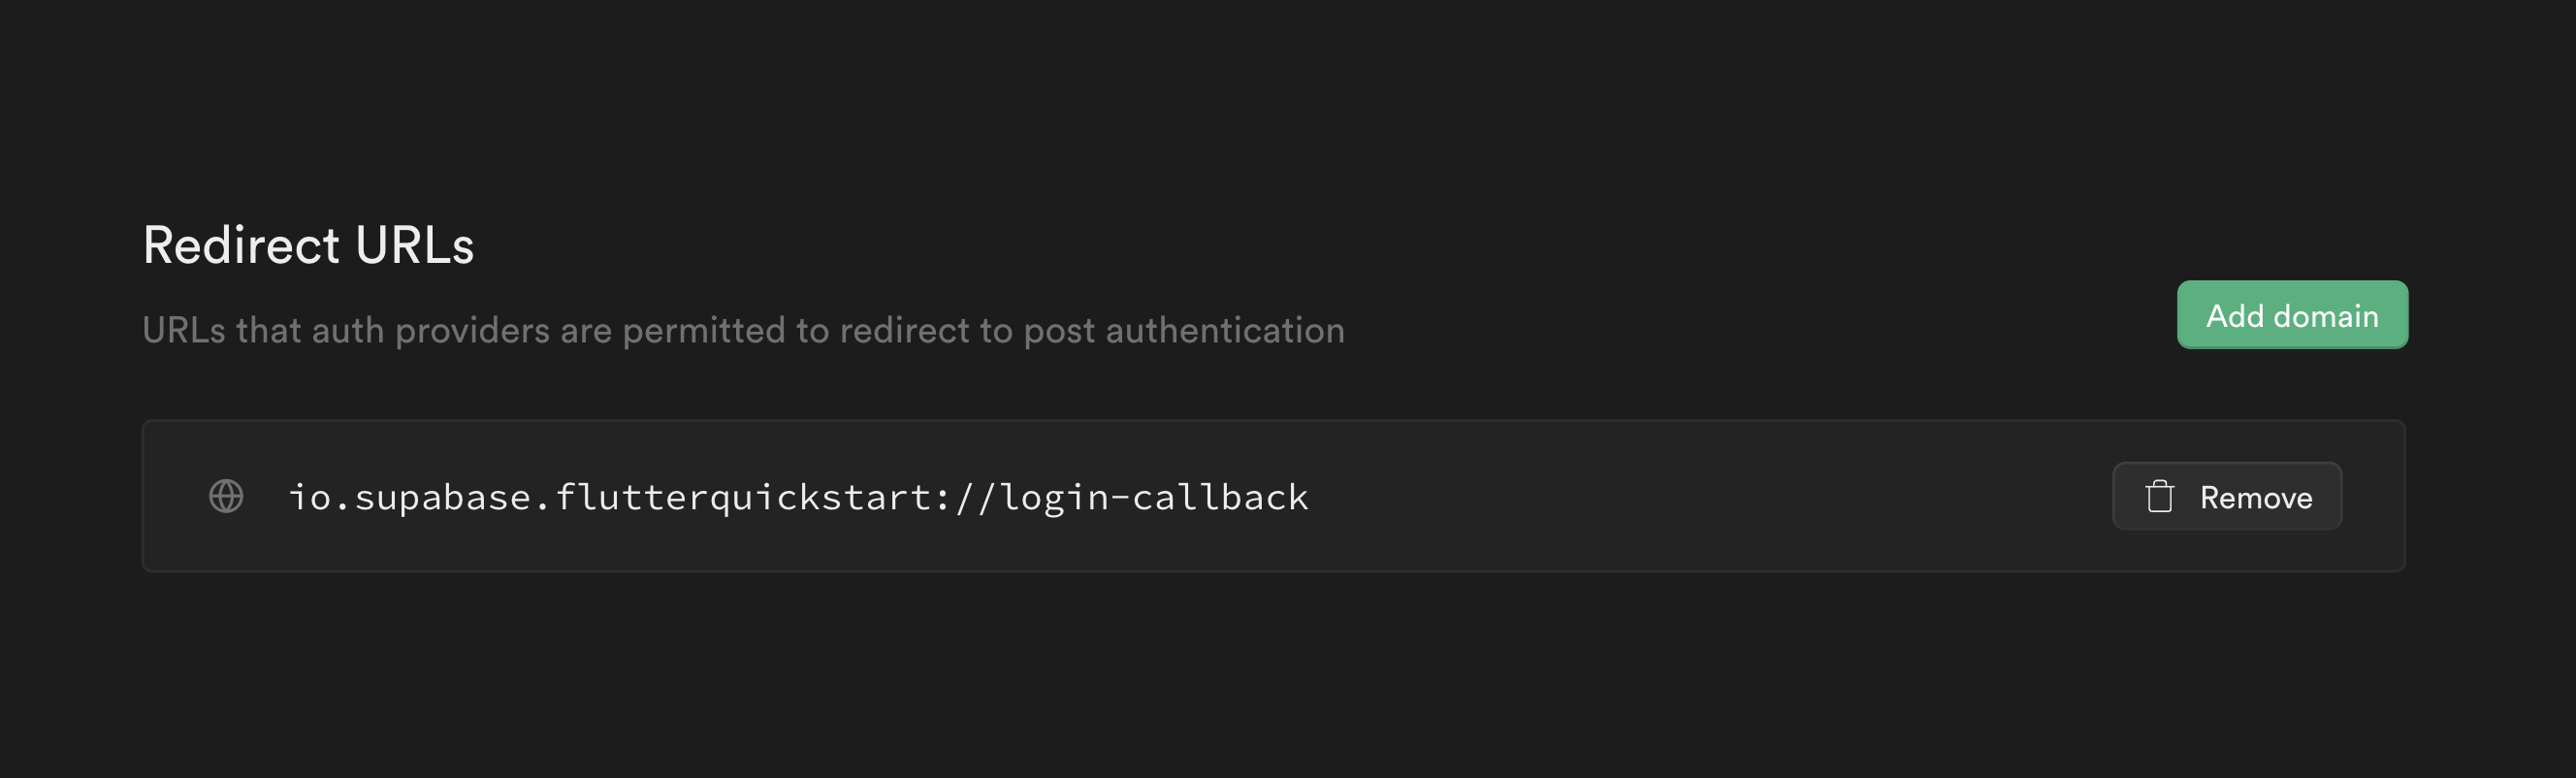
- 在 “附加重定向 URL “字段中输入应用程序重定向 URL。这是用户点击魔法链接后重定向到的 URL。
重定向回调 URL 的格式应为 [YOUR_SCHEME]://[YOUR_HOSTNAME]。这里,io.supabase.user-management://login-callback只是一个例子。你可以为YOUR_SCHEME和YOUR_HOSTNAME选择任何你想要的方案,只要该方案在用户的设备上是唯一的。因此,通常会使用网站的反向域名。
Supabase控制台深度链接设置
现在为您的应用程序添加一个自定义 URL,这样操作系统就知道如何在用户点击神奇链接后重定向回您的应用程序。
您可以按照 Apple 官方文档 使用 Xcode 的目标信息编辑器。
或者,在您的 Info.plist 文件中手动声明 URL 方案。
    <?xml version="1.0" encoding="UTF-8"?>
  <!DOCTYPE plist PUBLIC "-//Apple//DTD PLIST 1.0//EN" "http://www.apple.com/DTDs/PropertyList-1.0.dtd">
  <plist version="1.0">
  <dict>
    <!-- other tags -->
    <key>CFBundleURLTypes</key>
    <array>
      <dict>
        <key>CFBundleTypeRole</key>
        <string>Editor</string>
        <key>CFBundleURLSchemes</key>
        <array>
          <string>io.supabase.user-management</string>
        </array>
      </dict>
    </array>
  </dict>
  </plist>
深度链接配置 link
- 进入
用户认证->URL 配置页面。 - 在 “附加重定向 URL “字段中输入应用程序重定向 URL。这是用户点击魔法链接后重定向到的 URL。
重定向回调 URL 的格式应为 [YOUR_SCHEME]://[YOUR_HOSTNAME]。这里,io.supabase.user-management://login-callback只是一个例子。你可以为YOUR_SCHEME和YOUR_HOSTNAME选择任何你想要的方案,只要该方案在用户的设备上是唯一的。因此,通常会使用网站的反向域。
现在,编辑 Android 清单,确保用户点击神奇链接时应用程序会打开。
  <manifest ...>
  <!-- ... other tags -->
  <application ...>
    <activity ...>
      <!-- ... other tags -->

      <!-- Deep Links -->
      <intent-filter>
        <action android:name="android.intent.action.VIEW" />
        <category android:name="android.intent.category.DEFAULT" />
        <category android:name="android.intent.category.BROWSABLE" />
        <!-- Accepts URIs that begin with YOUR_SCHEME://YOUR_HOST -->
        <data
          android:scheme="YOUR_SCHEME"
          android:host="YOUR_HOSTNAME" />
      </intent-filter>
    </activity>
  </application>
</manifest>
更多信息请查阅 Android 文档。
接下来,在 Supabase 客户端中指定方案和主机:
  install(Auth) {
    host = "login-callback"
    scheme = "io.supabase.user-management"
}
最后,在应用程序打开时调用 Auth#handleDeeplinks :
  override fun onCreate(savedInstanceState: Bundle?) {
    super.onCreate(savedInstanceState)
    supabase.handleDeeplinks(intent)
}
现在,当您的应用程序收到有效的深度链接时,用户就会通过验证!